I updated a boot image with new controller and network card drivers and found all WDS services has stopped on PXE points.
One of the events were popular Event ID 258 — Image Server Configuration
The description for Event ID 258 from source WDSIMGSRV cannot be found. Either the component that raises this event is not installed on your local computer or the installation is corrupted. You can install or repair the component on the local computer.
If the event originated on another computer, the display information had to be saved with the event.
The following information was included with the event:
0xC1030104
Another event was 512 with same error information
An error occurred while trying to initialize provider WdsImgSrv from C:\Windows\system32\WdsImgSrv.dll. Since this provider is not marked as critical, Windows Deployment Services server will continue.
Error Information: 0xC1030104
and 1000
Faulting application name: svchost.exe_WDSServer, version: 6.1.7600.16385, time stamp: 0x4a5bc3c1
Faulting module name: wimgapi.dll, version: 6.1.7600.16385, time stamp: 0x4a5be09a
Exception code: 0xc0000005
Fault offset: 0x0000000000032a8e
Faulting process id: 0x9f0
Faulting application start time: 0x01ce820a679bb189
Faulting application path: C:\Windows\system32\svchost.exe
Faulting module path: C:\Windows\system32\wimgapi.dll
Report Id: aa4171a9-edfd-11e2-bd63-0050569b0082
and some other APPCRASH events about WDS.
So most of the resources recommends checking permissions, re-initialize the WDS or reinstall.
Your case might not be same as me but I recommend you to try something else before step in to recommended time consuming tasks.
Refresh!. Yes try to refresh your image first, Although SCCM says the boot image has updated successfully on PXE points try to refresh once. It worked for me, you can also copy image from refreshed source to test it. So I refreshed my PXE points and voila ! All WDS service problems have disappeared.
Currently I am not sure about the source of the problem but my feelings says it could be the binary difference replication.
www.infralib.com

Please visit my new site http://www.infralib.com for my and other authors' newer posts, articles. We will also have forums, videos, webcasts and etc.
Showing posts with label SCCM. Show all posts
Showing posts with label SCCM. Show all posts
Tuesday, 16 July 2013
Friday, 8 February 2013
Running 64bit CMD via 32bit SCCM client.
I needed to run dism.exe in an SCCM installation program, and I needed to call that via cmd.exe. I was getting Error Code 11 : You cannot service a running 64bit OS with a 32bit version of DISM

The cmd.exe under system32 is 64bit but running c:\windows\system32\cmd.exe /c …. still causes problem if it’s called from 32bit app, like sccm client or c:\windows\syswow64\cmd.exe
So calling c:\windows\system32\cmd.exe explicitly didn’t help.
The solution is using sysnativealias, example : c:\windows\sysnative\cmd.exe
Because when you use sysnative you also say don’t redirect me to windows.
You may experiencing this problem for DISM operations in Windows, in that case change your working folder to C:\Windows\System32 or call DISM from this folder to get rid of this error.
 More details @ http://msdn.microsoft.com/en-gb/library/windows/desktop/aa384187(v=vs.85).aspx

The cmd.exe under system32 is 64bit but running c:\windows\system32\cmd.exe /c …. still causes problem if it’s called from 32bit app, like sccm client or c:\windows\syswow64\cmd.exe
So calling c:\windows\system32\cmd.exe explicitly didn’t help.
The solution is using sysnativealias, example : c:\windows\sysnative\cmd.exe
Because when you use sysnative you also say don’t redirect me to windows.
You may experiencing this problem for DISM operations in Windows, in that case change your working folder to C:\Windows\System32 or call DISM from this folder to get rid of this error.

Friday, 18 January 2013
Deploying Skype with SCCM
First you'll need to download Business version of Skype, SkypeSetup.msi from http://www.skype.com/intl/en-gb/business/download and rest is easy as deploying standard MSI file,
You can also modify it with Orca or create a new transform, for example you might want to remove
Desktop Shortcut : Shortcut\SkypeDesktopShortcut
Sent to : Shortcut\SkypeSentToShortcut
Start after Install : CustomAction\SkypeStart1
Start at Windows Start up : Registry\reg08D3E7E5CD85CB55680CCDE42A2E2625 (Software\Microsoft\Windows\CurrentVersion\Run)
and run with the new mst, e.g. msiexec /i SkypeSetup.msi Transforms=SkypeCustom.mst ALLUSERS=1 /qb
Also I recommend you to download Skype IT Admin Guide from http://download.skype.com/share/business/guides/skype-it-administrators-guide.pdf
Thursday, 17 January 2013
ConfMgr SP1 - WSUS Upstream Server
One of the useful things that Configuration Manager 2012 SP1 has brought is allowing usage of WSUS as an upstream server.
Paragraph from http://technet.microsoft.com/en-us/library/jj591552.aspx
At the top-level Configuration Manager site, you can now specify an existing WSUS server as the upstream synchronization source location. During synchronization, the site connects to this location to synchronize software updates. For example, if you have an existing WSUS server that is not part of the Configuration Manager hierarchy, you can specify the existing WSUS server to synchronize software updates.
Friday, 11 January 2013
Propagating SCCM DB for "Hardware 02A - Estimated computer age by ranges within a collection" report
As you know or have just found Microsoft hasn't been updating the LU_CPU table in SCCM since 2006. So running a computer age report shows Not Available for computers have CPUs launched after 2006.
But you can update this data manually if you really need to run these reports. I did it in 1 day, it was boring but seeing the result was a big relief. Now I know I will not have to import hundreds of records again.
Result :

Steps? Here : )
1. Find discovered CPU information in v_GS_Processor, and exclude CPUs already exist in LU_CPU table.
SELECT DISTINCT
.[v_GS_PROCESSOR].CPUHash0 AS CPUHash,
.[v_GS_PROCESSOR].Manufacturer0 AS Manufacturer,
.[v_GS_PROCESSOR].BrandID0 AS BrandID,
.[v_GS_PROCESSOR].PCache0 AS PCache,
.[v_GS_PROCESSOR].NormSpeed0 AS NormSpeed,
.[v_GS_PROCESSOR].IsMobile0 AS Mobile,
.[v_GS_PROCESSOR].Name0 AS Name
FROM
.[v_GS_PROCESSOR]
LEFT JOIN
.[LU_CPU] as LC
ON
.[v_GS_PROCESSOR].CPUHash0 = LC.CPUHash
WHERE
LC.CPUHash is null
After running query and seeing the results you might want to add something like these to make it shorter by excluding bad looking ones to check them at the and.
and
.[v_GS_PROCESSOR].Name0 Like '%[0-9]%' /* Exclude rogue entries */
AND
.[v_GS_PROCESSOR].Manufacturer0 Like '%Intel%'
AND
.[v_GS_PROCESSOR].Name0 Not Like '[" "]%' /*Exclude duplicates and rogues*/
Now you have as much as usable data from the view, Column names match the LU_CPU as well.

2. Now you can take the query output to excel or to a temporary sql table to work on it, choice is yours. I used Excel to trim some information, because CPU names don't have a standard pattern to automatize parsing/filling.

I duplicated the Name Column and deleted all information by Find/Replace to leave CPU Model alone.

3. Then visited Intel's ARK ( http://ark.intel.com/search/advanced/ ) website to obtain a detailed CPU list, and imported it to another sheet.

4. Converted Launch dates to yyyy-mm-dd format, I written this to do that.
" DATE((CONCATENATE(20,RIGHT(B3,2))),(3*(MID(B3,2,1)))-2,1) "

5. Copied values of Processor Number and CPU_Birth to the Sheet I created at first with data from the first query. (VLOOKUP caused me problem when I used it in multiple sheet)
I added a column next to Name and with " =VLOOKUP(H2,P:Q,2,FALSE) " formula, P:Q here is the two columns from ARK table.

6. And added other necessary columns, also checked models names with eye and corrected names like M 430 to 430M etc. (Boring bit)

7. Rest is the inserting the table to LU_CPU, you can do that as you wish. You can concatenate columns and use with SQL's Insert Into.

This is lazy - non-creative way but very useful for future updates, as you can only add a new cpu and run it's command on SQL to add it. You can try to import from Excel file directly to LU_CPU too.

For remaining CPUs don't have CPU_Birth information you can use the SCCM reporting to find machines by clicking the Not Available on the top of the report, search machine with the query below
SELECT * FROM v_GS_PROCESSOR where SystemName0 = 'JK04-LT'
Add your findings to your table and find birth date manually on the web, ( I recommend http://www.cpu-world.com ) then insert you DB LU_CPU again.
You can also query LU_CPU table for NULL CPU_Births
SELECT DISTINCT [LU_CPU].Name
From [LU_CPU] where CPU_Birth is NULL
then find the Launch date manually on the web and update the column via Name
UPDATE [LU_CPU]
SET CPU_Birth = '2005-03-01'
Where Name = 'Intel(R) Celeron(R) M processor 1.50GHz'
Good luck !
But you can update this data manually if you really need to run these reports. I did it in 1 day, it was boring but seeing the result was a big relief. Now I know I will not have to import hundreds of records again.
Result :

Steps? Here : )
1. Find discovered CPU information in v_GS_Processor, and exclude CPUs already exist in LU_CPU table.
SELECT DISTINCT
.[v_GS_PROCESSOR].CPUHash0 AS CPUHash,
.[v_GS_PROCESSOR].Manufacturer0 AS Manufacturer,
.[v_GS_PROCESSOR].BrandID0 AS BrandID,
.[v_GS_PROCESSOR].PCache0 AS PCache,
.[v_GS_PROCESSOR].NormSpeed0 AS NormSpeed,
.[v_GS_PROCESSOR].IsMobile0 AS Mobile,
.[v_GS_PROCESSOR].Name0 AS Name
FROM
.[v_GS_PROCESSOR]
LEFT JOIN
.[LU_CPU] as LC
ON
.[v_GS_PROCESSOR].CPUHash0 = LC.CPUHash
WHERE
LC.CPUHash is null
After running query and seeing the results you might want to add something like these to make it shorter by excluding bad looking ones to check them at the and.
and
.[v_GS_PROCESSOR].Name0 Like '%[0-9]%' /* Exclude rogue entries */
AND
.[v_GS_PROCESSOR].Manufacturer0 Like '%Intel%'
AND
.[v_GS_PROCESSOR].Name0 Not Like '[" "]%' /*Exclude duplicates and rogues*/
Now you have as much as usable data from the view, Column names match the LU_CPU as well.
2. Now you can take the query output to excel or to a temporary sql table to work on it, choice is yours. I used Excel to trim some information, because CPU names don't have a standard pattern to automatize parsing/filling.

I duplicated the Name Column and deleted all information by Find/Replace to leave CPU Model alone.

3. Then visited Intel's ARK ( http://ark.intel.com/search/advanced/ ) website to obtain a detailed CPU list, and imported it to another sheet.

4. Converted Launch dates to yyyy-mm-dd format, I written this to do that.
" DATE((CONCATENATE(20,RIGHT(B3,2))),(3*(MID(B3,2,1)))-2,1) "

5. Copied values of Processor Number and CPU_Birth to the Sheet I created at first with data from the first query. (VLOOKUP caused me problem when I used it in multiple sheet)
I added a column next to Name and with " =VLOOKUP(H2,P:Q,2,FALSE) " formula, P:Q here is the two columns from ARK table.

6. And added other necessary columns, also checked models names with eye and corrected names like M 430 to 430M etc. (Boring bit)

7. Rest is the inserting the table to LU_CPU, you can do that as you wish. You can concatenate columns and use with SQL's Insert Into.
This is lazy - non-creative way but very useful for future updates, as you can only add a new cpu and run it's command on SQL to add it. You can try to import from Excel file directly to LU_CPU too.

For remaining CPUs don't have CPU_Birth information you can use the SCCM reporting to find machines by clicking the Not Available on the top of the report, search machine with the query below
SELECT * FROM v_GS_PROCESSOR where SystemName0 = 'JK04-LT'
Add your findings to your table and find birth date manually on the web, ( I recommend http://www.cpu-world.com ) then insert you DB LU_CPU again.
You can also query LU_CPU table for NULL CPU_Births
SELECT DISTINCT [LU_CPU].Name
From [LU_CPU] where CPU_Birth is NULL
then find the Launch date manually on the web and update the column via Name
UPDATE [LU_CPU]
SET CPU_Birth = '2005-03-01'
Where Name = 'Intel(R) Celeron(R) M processor 1.50GHz'
Good luck !
Monday, 7 January 2013
Using MDT DB to get location specific Domain Joining parameters in SCCM OSD
If you have multiple domains as me and want to automate domain joining task by sensing locations automatically in SCCM OSD, you can use MDT DB to do it easily. You can also do this by adding more actions with different queries to your TS or customizing your coustomsettings.ini. But I prefer using MDT DB as changes there doesn't need to be refresh as packages, GUI makes it easier to manage and more foolproof, etc.
All you need to do is modifying location details on your MDT DB and call these variables in your SCCM TS.
So first edit your location details in MDT Workbench, you'll need to edit four values here as shown below.

Then you'll need to modify your "Apply Network Settings" action in your TS to use values in MDT DB. It is very as MDT Workbench displays these as it is. So all you need to do adding % to the start and the end of the variable as below.
Domain : %JoinDomain%
DomainOU : %MachineObjectOU%
Account : %DomainAdmin%
Password : %DomainAdminPassword%

All done, now you can test it.
Please note that you'll need a working SCCM and MDT integration to use this method first.
All you need to do is modifying location details on your MDT DB and call these variables in your SCCM TS.
So first edit your location details in MDT Workbench, you'll need to edit four values here as shown below.

DomainAdmin : The name of the account used to join the domain. Example : OSDAdmin |
| DomainAdminDomain : The domain of the account used to join the domain. Example: Domain1 |
| DomainAdminPassword : The password of the account used to join the domain. |
| JoinDomain : The name of the domain in which the computer should be placed. Example: Domain1.local |
| MachineObjectOU : The OU in which the computer account should be created (if it does not already exist)., Exaple: OU=NewComps,DC=Domain1,DC=Local |
Domain : %JoinDomain%
DomainOU : %MachineObjectOU%
Account : %DomainAdmin%
Password : %DomainAdminPassword%

All done, now you can test it.
Please note that you'll need a working SCCM and MDT integration to use this method first.
Thursday, 6 December 2012
How to prompt for computer name in MDT/SCCM Task Sequence (OSD)
I was using Collection Variables in Collection Settings to ask Computer Name [OSDComputerName] at the beginning of my OSD Task Sequences. It was useful but it doesn't have confirmation or correction features.
So I wanted to change it to something asks if the entered computer names is correct and allow user to change name before final confirmation.
And it worked nicely : )
My new prompt for the computer name script is

Feel free to use, change or optimize.
You can create a SCCM Package and run this script via "Run Command Line" action in your task sequence (cscript "PromptForComputerName.wsf").
Or you can place it into your MDT Scripts (Toolkit package) and run "Use Toolkit Package" action before it from, then run (cscript "%deployroot%\Personal\PromptForComputerName.wsf") in a "Run Command Line" action just after "Use Toolkit Package".
Friday, 30 November 2012
MDT/SCCM OSD Task Sequence - Install Software Failed (hr=80008013) for Programs with dependencies
When you install an application with dependencies (nested); by running other SCCM package/programs first in MDT/SCCM OSD it fails with the error code 0x80008013 which means (E_FAIL_DEPENDENCY_NOT_RUN : This program cannot run because it depends on another program that has not run successfully before. This error code is returned to task sequence manager when a task sequence Install Software Action step cannot be run because the step has a child program which has not been run before.).
The reason is OSD in SCCM can't install the dependencies first, so you need to separate programs for your OSD Install software tasks.
The task sequence execution engine failed executing the action (Cisco Any Connect) in the group (Laptop Software) with the error code 2147516435 Action output: _ProgramID="Silent Install",PKG_PackageID="SMS0012C"' Verified policy is compiled in 'root\ccm\policy\machine' namespace content location count = 1 Invoking Execution Manager to install software
FALSE, HRESULT=80008013 (e:\nts_sms_fre\sms\client\osdeployment\installsoftware\installsoftware.cpp,282)
0, HRESULT=80008013 (e:\nts_sms_fre\sms\client\osdeployment\installsoftware\installsoftware.cpp,746)
Entering ReleaseSource() for \\DPSERVER\SMSPKGE$\SMS0012C reference count 1 for the source \\DPSERVER\SMSPKGE$\SMS0012C\ before releasing
Released the resolved source \\DPSERVER\SMSPKGE$\SMS0012CpInstall->Install(sPackageID, sProgramName), HRESULT=80008013 (e:\nts_sms_fre\sms\client\osdeployment\installsoftware\main.cpp,374)
Failed to invoke Execution Manager to Install Software for PackageID='SMS0012C' ProgramID='Silent Install' AdvertID='SMS20333' hr=0x80008013 Install Software failed, hr=0x80008013 Install Software failed, hr=0x80008013.
See http://technet.microsoft.com/en-us/library/bb632794.aspx for
Custom Error Codes for Configuration Manager 2007.
Thursday, 29 November 2012
MDT / SCCM OSD - Run actions based on chassis type
It is very easy to run chassis type specific actions in task sequences by querying , all you need to do is adding Task Sequence Variable in Options. Fill Variable field with IsLaptop , select your condition and write the value you wanted (True or False)

Monday, 26 November 2012
WinPE AdoDB SQL Connection Error (429)
I was using MDT wDB for OS deployments, now I am creating the same (better) system with SCCM for wider and easier deployment. I prefer MDT integration to SCCM as it provides lots of flexibility and customizability.
Today, I wanted to use MDT DB with my SCCM OSD, so I created a new MDT Settings package and copied my old CustomSettings.ini from MDT and customized. Duplicated my current build TS and changed the MDT Settings package in respective Gather actions.
Deployed a test machine and found out no localization settings have applied. So I found the error "Unable to create ADODB.Connection object, impossible to query SQL Server: ActiveX component can't create object (429)" in logs. After a few web search I found MDT Boot image usage is recommended as it has necessary libraries to create ADODB connections.
As usual I wanted to fix that instead of using my old MDT boot image, checked WinPE_FPs folder in WAIK and seen there is a winpe-mdac.cab (MS Data Access Components) and added this package to boot image.
- dism /mount-wim /WimFile:g:\wimwork\boot.csrx64.wim /index:1 /MountDir:G:\WimWork\x64
- dism /image:G:\WIMWork\csrx64 /Add-Package /PackagePath:"C:\Program Files\Windows AIK\Tools\PETools\amd64\WinPE_FPs\winpe-mdac.cab"
- dism /unmount-image /MountDir:G:\WIMWork\csrx64 /Commit
Now I have necessary libraries in my new boot image and it can connect to SQL server.
Note : Don't forget to change Netlib value to DBMSSOCN in your CustomSettings.ini if you will use SQL Authentication instead of Windows Authentication.
Thursday, 22 November 2012
Configuring regional settings automatically by using Win32_IP4RouteTable in Task Sequence
The idea was creating location specific variable sets to automatically configure regional settings during deployment.


Select * FROM Win32_IP4RouteTable WHERE Destination='0.0.0.0' AND
( NextHop='10.99.0.254' OR NextHop='10.101.0.254' OR NextHop='10.103.0.254' OR
NextHop='10.104.0.254' )
The query above is very useful as it queries the routing table to
find gateway and it looks ok when you run test it in SCCM Console.
But
It doesn’t work and generates errors below during deployment
(You can use VB, PS scripts, Control.exe with .xml file or other
methods by using same WMI query after Setup Windows & CM action (Windows
Mode) to set regional settings, they should be easier. But I wondered if I can
fix that one, as I always have used default boot images provided in WAIK and I
wanted to gain some familiarity with WinPE imaging/tools. I am sure the method
below may not be the good/best practise but that is what I did in last few
hours, it was good experimental work for me and I believe some parts can be
useful for others as well.)
Windows could not parse or process the unattended answer file for pass [specialize]. The settings specified in the answer file cannot be applied. The error was detected while processing settings for component [Microsoft-Windows-Shell-Setup].
Windows could not parse or process the unattended answer file for pass [specialize]. The settings specified in the answer file cannot be applied. The error was detected while processing settings for component [Microsoft-Windows-Shell-Setup].

If you click ok to Restart, it goes in to reboot loop with message
below.
The computer restarted unexpectedly or encountered an unexpected error. Windows installation cannot proceed. To install Windows, click "OK" to restart the computer, and then restart the
installation.

The computer restarted unexpectedly or encountered an unexpected error. Windows installation cannot proceed. To install Windows, click "OK" to restart the computer, and then restart the
installation.

And also the related error message can be found in advertisement
status messages.

If you check sms*.log files in deployment client drive you can
also find error messages related to operands. (Attaching .vhd is very useful to
do that.)
Reason ?
The reason is Win32_IP4RouteTable class is invalid as it is not
included in winpe-wmi.cab.

Win32_IP4RouteTable class has two files named Wmipiprt.mof and
Wmipiprt.dll
(For more details : http://msdn.microsoft.com/en-gb/library/windows/desktop/aa394162(v=vs.85).aspx
)
So I wanted to include this class to my Win-PE image.
1. Preperation
Enable command support option in your current boot image, start
deployment but don’t select TS and proceed to installation.

Press F8 to open command prompt
Connect to your workstation
(net use K: \\yourmachine\c$ )
Copy the wmipiprt.* files to Windows\System32\wbem folder (X:
Drive)
(Copy
K:\windows\system32\wbem\wmipiprt.* X:\Windows\System32\wbem)
Change your working folder to X:\Windows\System32\wbem
Cd
X:\Windows\System32\wbem
Run MOF compiler for the class
Mofcomp wmipiprt.mof
Take a copy of Win-PE Wbem
Xcopy
X:\Windows\System32\wbem K:\WinpeWork\ /s /e
Register the the dll
Regsvr32 wmipiprt.dll
Backup Win-PE HKLM\Software (If you are ok the .reg file I
provided you can skip all reg steps until Modifying the Image)
Reg save HKLM\SOFTWARE HKLMSoft.reg
Take a copy of exported reg file
Copy
HKLMSoft.reg K:\WinpeWork\
On your workstation
Load the C:\Winpework\HKLMSoft.reg file with load hive option to
your workstations HKLM, you can use any name for Hive name (e.g. WINPE)

Then search wmipiprt in loaded hive,

You’ll find two entries under CLSID, export these to .reg files
and merge in one reg file. And unload the hive “WINPE”. (You can also use the .reg below)
Windows Registry Editor
Version 5.00
[HKEY_LOCAL_MACHINE\WIMSOFT\Classes\CLSID\{23B77E99-5C2D-482D-A795-62CA3AE5B673}]
@="WBEM IP Route
Provider"
[HKEY_LOCAL_MACHINE\WIMSOFT\Classes\CLSID\{23B77E99-5C2D-482D-A795-62CA3AE5B673}\InprocServer32]
@="X:\\Windows\\System32\\wbem\\WMIPIPRT.dll"
"ThreadingModel"="Both"
[HKEY_LOCAL_MACHINE\WIMSOFT\Classes\CLSID\{6D7A4B0E-66D5-4AC3-A7ED-0189E8CF5E77}]
@="WBEM IP Route
Event Provider"
[HKEY_LOCAL_MACHINE\WIMSOFT\Classes\CLSID\{6D7A4B0E-66D5-4AC3-A7ED-0189E8CF5E77}\InprocServer32]
@="X:\\Windows\\System32\\wbem\\WMIPIPRT.dll"
"ThreadingModel"="Both"
2. Modifying
the image (Be sure you have a backup of your original boot image in separate
place.)
Mount your boot image in writable
mode.
Imagex
/mountrw G:\WIMWork\x64boot.wim G:\WIMWork\x64mount
(G:\WIMWork\x64mount
is an empty folder)
Open G:\WIMWork\x64mount folder,
you’ll see your winpe image contents
Delete G:\WIMWork\x64mount\Windows\System32\wbem
contents
Copy the K:\WinpeWork\wbem content you
have copied from running Win-PE to your work folder in first steps of
Preparation above.
Run Regedit, select HKLM then select
load hive from menu,Select G:\WIMWork\x64mount\Windows\System32\Config\Software
to load and give WIMSOFT as a name if you are going to use my .reg file above.
Run the .reg you’ve created by
correcting paths or directly the one above. (Check two new entries under
WIMSOFT\Classes\CLSID)
Unload WIMSOFT Hive.
Now we need to dismount the image with
commit option.
Imagex /unmount /commit
G:\WIMWork\x64mount
Finished.
Take a backup of your current boot
image on SCCM, copy this one to your source and update your distribution points
to test. (Or create a new image, to test first.)

Now you can use Win32_IP4RoutingTable
in Win-PE mode.
Place your variable set tasks just
before the Configure action in PostInstall phase.
Friday, 16 November 2012
How to disable password requirement in SCCM PXE Service Point
You set a password before and unset by removing the tick, but it still asks for a password, the problem here is removing the tick is not enough to disable password protection, so delete passwords first then remove the tick, apply settings and click ok.
Friday, 14 September 2012
How to exclude a collection from a collection in SCCM
To exclude a collection from another collection, add the query below to Criteria section by using Show Query Language window.
select SMS_R_SYSTEM.ResourceID,SMS_R_SYSTEM.ResourceType,SMS_R_SYSTEM.Name,SMS_R_SYSTEM.SMSUniqueIdentifier,SMS_R_SYSTEM.ResourceDomainORWorkgroup,SMS_R_SYSTEM.Client from SMS_R_System where SMS_R_System.ResourceId not in (select ResourceID from SMS_CM_RES_COLL_CAM001B6) and SMS_R_System.ResourceId not in (select ResourceID from SMS_CM_RES_COLL_SMS00011)
The bold blue text here is the excluded collection ID.
Another example
select SMS_R_SYSTEM.ResourceID,SMS_R_SYSTEM.ResourceType,SMS_R_SYSTEM.Name,
SMS_R_SYSTEM.SMSUniqueIdentifier,SMS_R_SYSTEM.ResourceDomainORWorkgroup,
SMS_R_SYSTEM.Client from SMS_R_System where
SMS_R_System.OperatingSystemNameandVersion = "Microsoft Windows NT Workstation 6.1"
and SMS_R_System.Client = 1 and SMS_R_System.ClientType = 1 and SMS_R_System.ResourceId
not in (select ResourceID from SMS_CM_RES_COLL_SMS00024)


Thursday, 19 July 2012
Error Code descriptions for SCCM 2007
Links below provide custom error codes and their descriptions for SCCM 2007. They are very helpful.
- Client Custom Error Codes
- Desired Configuration Custom Error Codes
- Inventory Custom Error Codes
- Mobile Device Management Custom Error Codes
- Operating System Deployment Custom Error Codes
- Remote Tools Custom Error Codes
- Software Distribution Custom Error Codes
- Software Updates Custom Error Codes
- Troubleshooting Desired Configuration Management Using Custom Error Codes
- Troubleshooting Inventory Using Custom Error Codes
- Troubleshooting Mobile Device Management Using Custom Error Codes
- Troubleshooting Operating System Deployment Using Custom Error Codes
- Troubleshooting Remote Tools Using Custom Error Codes
- Troubleshooting Software Distribution Using Custom Error Codes
Wednesday, 23 May 2012
Find error code descriptions from decimal long number in SCCM 2007 reports
Convert error code from decimal to hexadecimal
- 2147746369 > 80040241
- -2147220846 > FFFFFFFF80040292 (Ignore first 8 Fs)
Converted error codes that begin with 800402 or 800403 are typically System Center Configuration Manager 2007 error codes.
Visit http://technet.microsoft.com/en-us/library/bb632794.aspx for all custom error codes for Configuration Manager 2007.
All other error codes are typically Windows error codes or third-party error codes. All Windows error codes can be identified by using the Trace32 program and by specifying the error code, such as "80072EE7."
This is a summarized versiom of http://support.microsoft.com/kb/944375/en-us
Sunday, 1 January 2012
Fix for "WARN: Could not get property (domain) for system (0x80005010)"
The Active Directory system discovery process cannot detect a client if the DNS suffix of the client differs from its DNS domain name in System Center Configuration Manager 2007 SP2
To request the hotfix from MS or to see more details : http://support.microsoft.com/kb/2345551
File Information
To request the hotfix from MS or to see more details : http://support.microsoft.com/kb/2345551
File Information
| File name | File version | File size | Date | Time | Platform |
|---|---|---|---|---|---|
| Adsgdis.dll | 4.0.6487.2159 | 40,296 | 01-Feb-2010 | 13:50 | x86 |
| Adsource.dll | 4.0.6487.2159 | 126,824 | 01-Feb-2010 | 13:50 | x86 |
| Adsysdis.dll | 4.0.6487.2159 | 42,344 | 01-Feb-2010 | 13:50 | x86 |
| Adsysgrp.dll | 4.0.6487.2159 | 40,296 | 01-Feb-2010 | 13:50 | x86 |
| Adusrdis.dll | 4.0.6487.2159 | 40,296 | 01-Feb-2010 | 13:50 | x86 |
Friday, 11 November 2011
Create Desktop Shortcut with Script
Hi all
Today, I have received an application to deploy with SMS Server 2003, I had to create a MSI Package and some scripts to make that application installation most user friendly, actualy without need to user interaction. So I have needed a script that can find logged user profile folder and create a desktop shortcut to the configuration file in user profile folder.
I have found an article about how to create desktop shortcuts at Technet http://www.microsoft.com/technet/scriptcenter/guide/sas_wsh_aytf.mspx?mfr=true , it is detailed enough to understand how to do it,
Technet Script :
Set objShell = WScript.CreateObject("WScript.Shell")
strDesktopFolder = objShell.SpecialFolders("AllUsersDesktop")
Set objShortCut = objShell.CreateShortcut(strDesktopFolder & "\IIS Manager.lnk")
objShortCut.TargetPath = "%SystemRoot%\System32\Inetsrv\iis.msc"
objShortCut.Save
As you see above script creates WshShortcut object by calling CreateOBject, than it defines Desktop folder path with strDesktopFolder by AllUsersDesktop value. But we will change this script to locate and crete a desktop shortcut of a file that unique for every user.
First of all we need to find logged users profile path, to do this we will get USERSPROFILE value from Windows Environment Settings by adding this line
UsersProfile = objShell.ExpandEnvironmentStrings("%USERPROFILE%")
now we know logged users profile path has defined in UsersProfile (e.g. C:\Documents and Settings\OShener)
*Tip : You can get another Windows Environment variables values by using objShell.ExpandEnvironmentStrings by changing variable name in (%%) , you can check your existing environment variables by running set command in command promt too.
So where is our user specific target file for shortcut ? Let assume it is located in DW folder and the DW folder is in the the logged users profile folder. Now we are going to define a variable to fix the target file path with this line:
objShortCut.TargetPath = UsersProfile & "\DW\DW.conf"
and to find and define logged users desktop path to a variable we add this line to the script too
strDesktopFolder = objShell.SpecialFolders("Desktop")
and we have to define the Desktop Shortcut location before create it
Set objShortCut = objShell.CreateShortcut(strDesktopFolder & "\DWConf.lnk")
Ok, let tidy up the script and see what we have now ?
Set objShell = WScript.CreateObject("WScript.Shell")
UsersProfile = objShell.ExpandEnvironmentStrings("%USERPROFILE%")
strDesktopFolder = objShell.SpecialFolders("Desktop")
Set objShortCut = objShell.CreateShortcut(strDesktopFolder & "\DWConf.lnk")
objShortCut.TargetPath = UsersProfile & "\DW\DW.conf"
objShortCut.Save
If you wish you can add different properties to your shortcut too, like Windows HotKey, Description, Working Folder, only thing you need to do that add ObjShortcut properties as : objShortCut.HotKey = "Ctrl+Shift+D" and refer to the link : http://www.microsoft.com/technet/scriptcenter/guide/sas_wsh_aytf.mspx?mfr=true
Regards
Osman Shener 19th-09-2007
Monday, 16 May 2011
SMS 2003 Report - Access Denied / ASP 0178 : 80070005
If you have got a SMS 2003 Server which runs on Windows Server 2003 with SP1 installed and if you gave access rights to a non-administrator user for SMS Reports , probably you are getting Error : Access is Denied error on IE. If you have already added this user to SMS Reporting Users local group on the SMS Server and if you are getting the error below
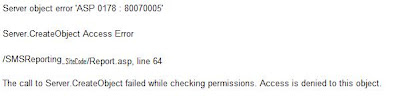
Server object error 'ASP 0178 : 80070005'
Server.CreateObject Access Error
/SMSReporting.SiteCode/Report.asp, line 64
The call to Server.CreateObject failed while checking permissions. Access is denied to this object.
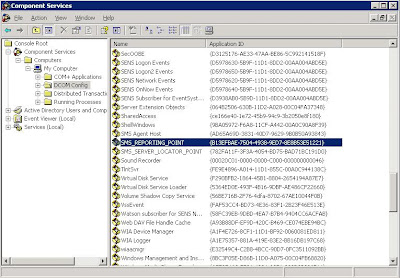
The reason is hardened DCOM settings in Windows 2003 SP1
To resolve this problem run Component Services which is under Administrative Tools and find the SMS_REPORTING_POINT as shown below
Now select Security tab
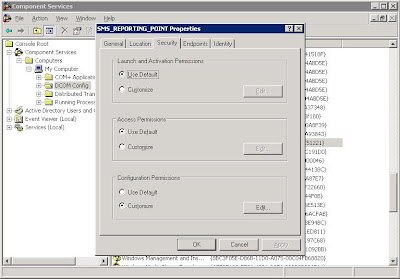
Select Customize option for Launch and Activation Permissions then select Edit
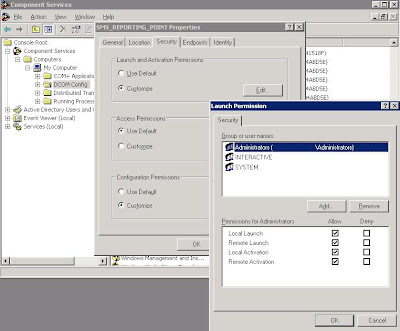
Now add SMS_Reporting_Users local group and clear Local Launch option and select Allow for Local Activation, then aprrove all setting by click OK.
If you want to read more information about DCOM changes in Windows 2003 SP1 I recommend you to visit DCOM Security Enhancements site.

Server object error 'ASP 0178 : 80070005'
Server.CreateObject Access Error
/SMSReporting.SiteCode/Report.asp, line 64
The call to Server.CreateObject failed while checking permissions. Access is denied to this object.
The reason is hardened DCOM settings in Windows 2003 SP1
To resolve this problem run Component Services which is under Administrative Tools and find the SMS_REPORTING_POINT as shown below

Now select Security tab

Select Customize option for Launch and Activation Permissions then select Edit

Now add SMS_Reporting_Users local group and clear Local Launch option and select Allow for Local Activation, then aprrove all setting by click OK.
If you want to read more information about DCOM changes in Windows 2003 SP1 I recommend you to visit DCOM Security Enhancements site.
Subscribe to:
Comments (Atom)